I nearly panicked reading a single line printed at the bottom of my SSC CGL OMR Answer Sheet practice sheet. It said any sheet with incorrect coding of particulars would be awarded zero marks, no partial evaluation, nothing. That one warning made me realize this OMR sheet demands a completely different level of care compared to any school test I had filled before.
If you are preparing for SSC CGL and looking into how the actual 200-question OMR answer sheet works, I have gone through this exact two-sided sheet during my own practice rounds. I want to walk you through every section, including the parts that genuinely worried me the first time I saw them.
Why This Sheet Feels So High-Stakes Right From the Start
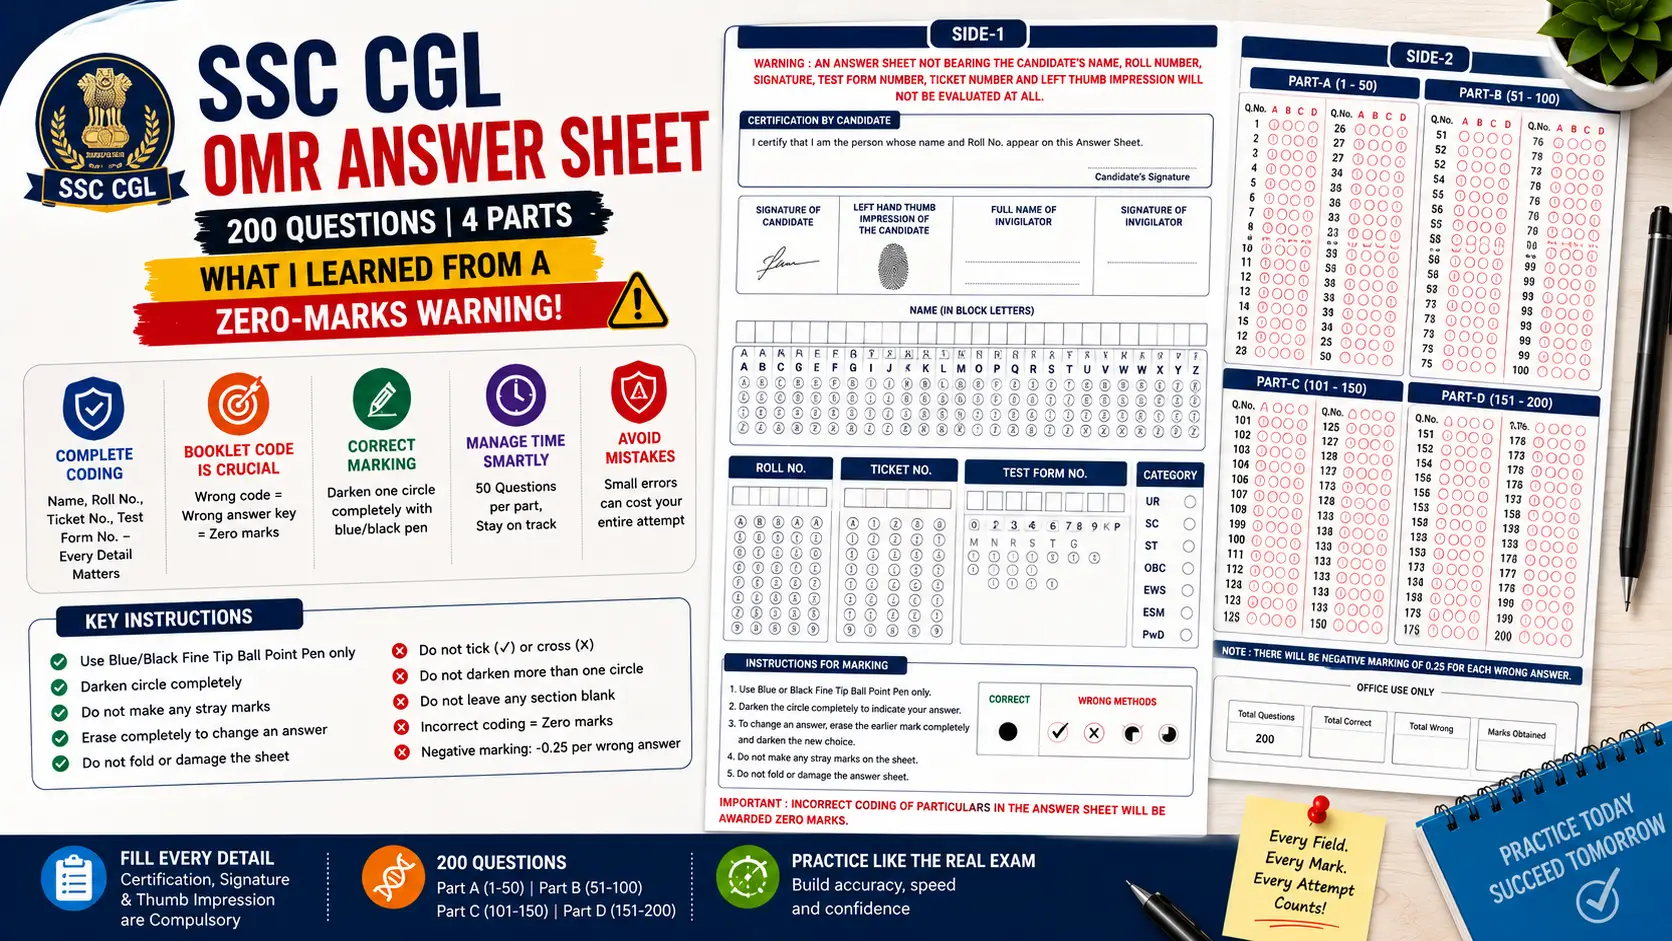
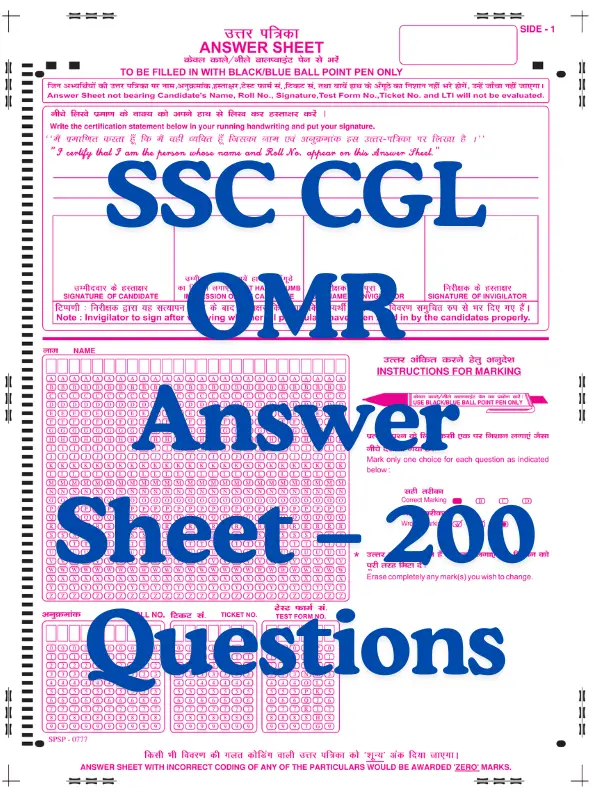
The moment you look at Side-1 of this answer sheet, you notice a bold warning printed near the very top. It clearly states that an answer sheet not bearing the candidate’s name, roll number, signature, test form number, ticket number, and left thumb impression will not be evaluated at all. I remember reading this line and immediately double-checking every single field I had filled so far in my mock attempt.
Right below that warning sits a certification statement that you actually need to copy in your own handwriting and then sign. It reads, “I certify that I am the person whose name and Roll No. appear on this Answer Sheet,” and you write this exact line by hand before signing below it. This was new to me, since I had never encountered a sheet asking candidates to physically write out a certification statement before.
The Signature and Thumb Impression Section
Below the certification statement, Side-1 has four separate boxes lined up together. These are for the Signature of Candidate, Left Hand Thumb Impression of the Candidate, Full Name of Invigilator, and Signature of Invigilator. I remember feeling a bit awkward the first time I had to practice filling a thumb impression box during a mock session, since it felt unusually formal for a practice test.
A note printed right below these four boxes states clearly that the invigilator should sign only after verifying that all details have been properly filled in by the candidate. This tells you that your own signature and thumb impression are checked by a real person before the exam even begins, not just scanned later by a machine. Getting comfortable with this section during practice genuinely helps reduce nervousness on the actual exam day.
The Massive Name Grid and What I Got Wrong
Right below the signature section, Side-1 has a full scannable NAME grid, where every single letter of your name gets written in a box and then darkened using the matching circle below it. This name grid runs the entire width of the page, with columns of circles from A through Z stacked under every letter box. During my first attempt, I wrote my name in the boxes but completely forgot to darken the circles underneath, assuming the written letters alone were enough for identification.
My mistake here connects directly back to that zero-marks warning at the top of the sheet. If the machine reading this sheet cannot properly detect a coded name through the darkened circles, your entire answer sheet risks being marked as incorrectly coded. I now treat this name grid as seriously as I treat the actual answer bubbles, checking every single circle before moving forward.
Roll No, Ticket No, and Test Form No Explained
Below the name grid, Side-1 splits into three separate coding sections, Roll No, Ticket No, and Test Form No, each with its own grid of digit boxes and circles underneath. The Roll No and Ticket No sections use standard 0 through 9 digit circles, just like the name grid uses letter circles. The Test Form No section is a little different, using a mix of numbers and letters like K, P, M, N, R, S, T, and G in its circle options.
This mixed alphanumeric coding for the Test Form No confused me initially, since I expected only numbers there based on how the other two sections looked. Reading the actual test form number carefully on my mock question paper, then matching each character correctly, avoided this confusion completely. Skipping even one of these three coding sections risks the same zero-marks outcome mentioned right at the top of the sheet.
Understanding the Marking Instructions
On the right side of Side-1, there is a clear Instructions for Marking box, showing exactly how a correct mark should look compared to several wrong marking styles. The correct method shows one fully and solidly darkened circle, while the wrong methods show a checkmark inside the circle, a cross mark, and two different styles of partially filled circles. This visual comparison genuinely helped me understand what “properly darkened” actually looks like in practice.
The instructions also state clearly that if you want to change an answer, you must completely erase the earlier mark before marking a new one. This detail matters a lot on an SSC CGL sheet specifically, since half-erased marks can easily confuse a scanner into reading two selected options instead of one corrected answer.
Step-by-Step: How I Fill This Exact SSC CGL Sheet Now
After my early name-grid mistake, I built a strict filling order that I now follow for every single mock attempt using this format.
- I write and sign the certification statement in my own running handwriting first, treating it as seriously as an actual exam declaration.
- I fill the Signature of Candidate and Left Hand Thumb Impression boxes, even during practice, to build the habit properly.
- I write my Name in the grid boxes, then carefully darken every single matching circle underneath, letter by letter.
- I fill my Roll No, Ticket No, and Test Form No sections, matching each digit or character exactly to my actual mock question paper.
- I flip to Side-2 and begin answering questions, moving through Part A, Part B, Part C, and Part D in order.
- I darken exactly one full circle per question, checking the Correct Marking example again whenever I feel unsure.
- If I need to change an answer, I erase the earlier mark completely before darkening a new circle, never leaving a partial mark behind.
- Before finishing, I recheck Side-1 once more, confirming every coded section is properly darkened, not just written.
This order stopped me from rushing straight into answering questions while skipping the equally important coding sections on Side-1.
The Four-Part Layout on Side-2
Side-2 of this sheet organizes all 200 questions into four clearly labeled sections, Part A, Part B, Part C, and Part D, each covering fifty questions. Part A covers questions 1 through 50, Part B covers 51 through 100, Part C covers 101 through 150, and Part D wraps up with 151 through 200. This structure matches how SSC CGL typically organizes its actual paper into separate sections by subject.
I found this four-part layout genuinely useful for building subject-wise pacing during my mock attempts. Since SSC CGL sections often cover different subjects entirely, tracking my time separately for each fifty-question part gave me a much clearer picture of where I was spending too long. A clearly printed note at the bottom of Side-2 also reminds you that there will be negative marking of 0.25 for each wrong answer, which genuinely shaped how selectively I started attempting questions during later practice rounds.
A Mistake That Taught Me to Slow Down
During one mock attempt, I darkened two circles for question 87 because I changed my mind at the last moment without erasing my first mark completely. Since the instructions clearly state that incomplete erasing counts as improper marking, I treated this exact question as wrong during my own evaluation afterward, exactly how a real scanner likely would. That single careless moment taught me to fully commit to erasing, not just scribbling over, whenever I change an answer.
Common Mistakes to Avoid
Based on my own practice attempts and details taken directly from the actual sheet’s printed instructions, these mistakes come up most often with this specific format.
- Writing your name or roll number clearly but forgetting to darken the matching circles underneath.
- Skipping the certification statement or the signature and thumb impression boxes on Side-1.
- Leaving the Test Form No section incomplete, since it uses a mixed alphanumeric coding system.
- Erasing an old answer only partially before marking a new one, which can register as two selected options.
- Ignoring the negative marking note, leading to overly risky guessing across a 200-question paper.
Catching even a few of these mistakes early during your own mock practice genuinely reduces the risk of an avoidable zero-marks outcome.
Final Thoughts
The SSC CGL OMR Answer Sheet for 200 questions carries a level of coding detail that goes well beyond just filling in answer bubbles, and understanding every section properly makes a real difference. I only understood how seriously this sheet treats its coding sections after nearly making the same mistake with my own name grid. Once you treat every part of Side-1 with the same care as your actual answers on Side-2, this sheet stops feeling intimidating.
Practice with a proper SSC CGL-style OMR sheet regularly, paying close attention to every coded section, not just the answer grid. By the time your actual exam day arrives, filling this sheet correctly from the certification statement to the final answer bubble will feel completely automatic, leaving your full focus on the 200 questions that truly decide your result.