My younger cousin stared at his SOF Olympiad OMR sheet with genuine confusion, asking me why the sheet had a random name like “SACHIT A. IYER” printed on the back. I explained it was actually a worked example, showing exactly how to write and darken his own name, not someone else’s real answer sheet. That single misunderstanding turned into a proper sit-down session where I walked him through the whole sheet, section by section.
If you are helping a child prepare for the SOF National Science Olympiad, or if you are a student attempting it yourself, this exact two-sided OMR sheet is what you will actually fill on exam day. I have gone through this sheet closely while helping my cousin, and I want to share what genuinely made a difference once we understood every section properly.
Why This Sheet Opens With a Clear Warning
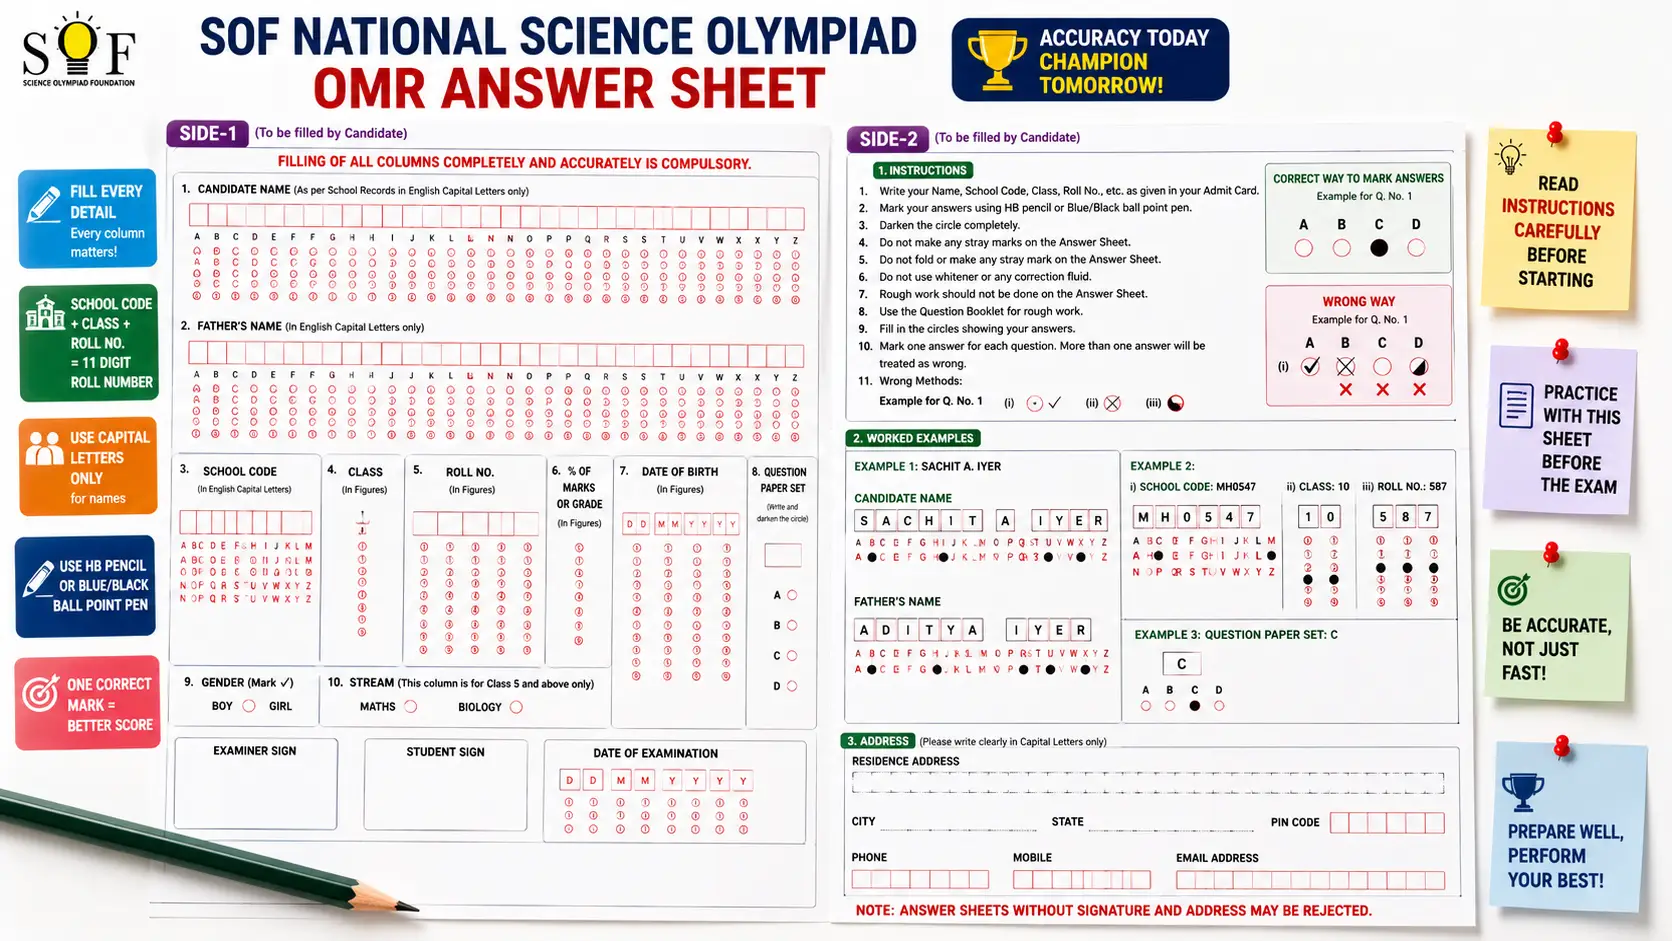
Right at the top of Side-1, printed in bold, the sheet states that filling of all columns completely and accurately is compulsory. This is not just a polite suggestion, since Side-2 later reinforces it further, stating clearly that answer sheets without signature and address may be rejected entirely. For a young student taking their first Olympiad exam, this warning genuinely sets the tone for how seriously every single section needs to be treated.
I remember explaining to my cousin that this sheet is not like a regular school test where a missing detail might just get a gentle reminder from the teacher. Here, an incomplete column can risk the entire answer sheet being rejected, regardless of how well he actually answers the science or maths questions themselves.
The Candidate Name and Father’s Name Grids
Side-1 starts with two scannable grids, one for Candidate Name and one for Father’s Name, both specifically requiring English capital letters only. Each grid stretches across the full width of the page, with individual letter boxes on top and a complete alphabet, A through Z, stacked as circles underneath every single box. My cousin’s first instinct was to write his name and skip the circles entirely, exactly the same mistake I have seen adults make on other formal OMR sheets too.
Thankfully, Side-2 of this exact sheet includes a genuinely helpful worked example. It shows that if your name is SACHIT A. IYER, you write S, A, C, H, I, T in the first six boxes, leave a blank space, then write A, then another blank space, then I, Y, E, R for the last name. Seeing this printed example next to the actual blank grid made everything click for my cousin almost instantly, far faster than if I had just explained it verbally.
Understanding School Code, Class, and Roll Number Together
This sheet has a genuinely clever detail explained directly in its instructions. It states that School Code plus Class plus Roll Number together marks your complete 11 digit roll number. This means these three separate looking sections on Side-1 are not actually independent details, but combine together into one single identifying number used by SOF during evaluation.
The worked example on Side-2 walks through this clearly, showing that if your school code is MH0547, you darken the circles for M, H, 0, 5, 4, 7 across the School Code grid. If you are in Class 10, you darken circle 1 and circle 0 in the Class section. If your roll number is 587, you darken 5, 8, 7 in the Roll No. section. Walking my cousin through this exact worked example helped him understand why every one of these smaller sections actually matters just as much as the answer bubbles themselves.
The Question Paper Set Section That Is Easy to Miss
Towards the top right of Side-1, there is a small but important Question Paper Set box, with options A, B, C, and D listed below it. The worked example explains this clearly too, stating that if your set is C, you write C in the box and darken the matching circle below it. I have seen students, including my cousin during his first attempt, glance right past this tiny section simply because it looks small compared to the larger grids surrounding it.
Getting this Question Paper Set detail wrong could mean your answers get evaluated against a completely different set of correct answers than the ones you actually solved. This is exactly the kind of small, easy-to-miss section that genuinely deserves a proper pause and double-check before moving into the actual answer bubbles.
Marking Instructions and the Correct Way to Darken a Circle
Instruction number 10 on Side-1 clearly states that you should mark your answers using an HB pencil or a blue or black ball point pen. Side-2 reinforces this with a genuinely useful visual comparison, showing a Correct Way to darken the circle next to a Wrong Way example, which includes a checkmark, a cross mark, and a partially filled circle as clear mistakes to avoid.
I made sure my cousin practiced this exact correct darkening method a few times on a spare printed copy before attempting a full mock round. Instruction 11 also shows a specific Wrong Methods example using question 1 as a sample, reinforcing the same idea one more time in a slightly different format.
Step-by-Step: How We Now Practice With This Exact Sheet
After helping my cousin through his confusion, we built a fixed routine for filling this sheet, and we now follow the same order every single practice round.
- We fill the Candidate Name and Father’s Name grids first, writing in capital letters and darkening every matching circle underneath.
- We fill the School Code, Class, and Roll No. sections together, remembering they combine into one complete 11 digit identifying number.
- We fill the % of Marks or Grade, Date of Birth, and Question Paper Set sections, double checking each one against actual registration details.
- We mark the Gender circle correctly, and check the Stream section if applicable, since this sheet includes options for Maths and Biology specifically for Classes 5 and above.
- We fill the Residence Address, City, State, PIN Code, Phone, Mobile, and Email Address fields on Side-2 clearly and completely.
- We solve each question separately, then mark exactly one complete circle per answer using either an HB pencil or a blue or black pen.
- Right before finishing, we sign in the Signature of the Candidate & Date of Examination box, treating this as seriously as the actual answers.
This exact order stopped my cousin from jumping straight into answering questions while skipping the equally important identification sections entirely.
Real Example: Why the Stream Section Matters for Older Students
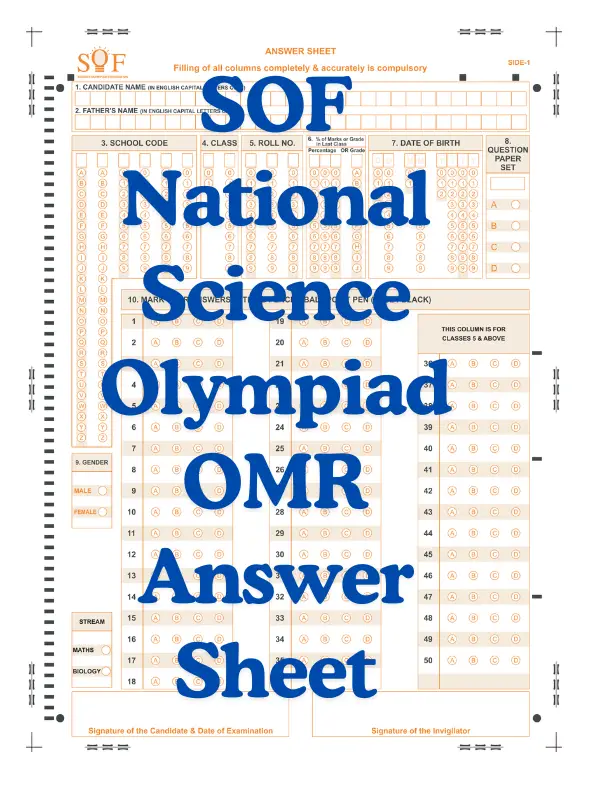
The sheet includes a specific STREAM section on Side-1, with Maths and Biology as options, and a clear note stating this column is for Classes 5 and above. My cousin, being in a younger class, did not need to fill this section at all, but I have heard from other parents that older Olympiad participants sometimes forget this specific stream selection entirely. Since Olympiad exams often branch into subject-specific evaluation at higher classes, skipping this detail could genuinely affect how a student’s paper gets processed.
Common Mistakes to Avoid
Based on our own experience helping a first-time Olympiad participant, along with details taken directly from this sheet’s own instructions, these mistakes come up most often.
- Writing the Candidate Name or Father’s Name clearly but forgetting to darken the matching circles underneath each letter.
- Treating School Code, Class, and Roll No. as separate, unrelated sections instead of understanding they form one combined 11 digit number.
- Skipping the small Question Paper Set box, which can lead to answers being evaluated against the wrong answer key entirely.
- Forgetting the Stream selection for Classes 5 and above, when applicable to the specific Olympiad subject.
- Leaving the Residence Address or contact details incomplete on Side-2, risking outright rejection of the answer sheet.
Catching even a couple of these mistakes early, through a calm practice round like the one we did, genuinely reduces the risk of an avoidable rejection or evaluation mismatch.
Final Thoughts
The SOF National Science Olympiad OMR answer sheet carries far more identification detail than a simple answer bubble sheet, and its own worked examples genuinely help once you take the time to read them properly. I only fully understood every section after sitting down with my cousin and going through the sheet slowly, matching each printed example to the actual blank grids. Once a student understands these sections properly, filling this sheet stops feeling confusing and starts feeling completely manageable.
Sit down with a printed copy of this exact sheet before the actual exam day, and walk through the worked examples on Side-2 together, one section at a time. That small, shared practice session removes the confusion entirely, leaving a young student’s full focus on the science and maths questions that actually decide their Olympiad rank.