I sat down for a full mock test, pulled out my favorite HB pencil out of pure habit, 150 Questions OMR Sheet and started filling the circles exactly like I always had. Halfway through the name section, my study partner glanced over and pointed at a line printed clearly on the sheet: use of pencils is strictly prohibited. I had been marking half my answers with the wrong tool entirely, and I did not even notice until someone else caught it.
If you are looking for a 150 questions OMR sheet PDF, specifically one with a full name grid and detailed instructions, this is exactly the kind of format that trips up a lot of students the same way it tripped me up. I want to walk you through every section of this exact sheet, based on what I actually experienced while practicing with it.
Why This Particular 150 Questions OMR Sheet Is More Detailed Than Most
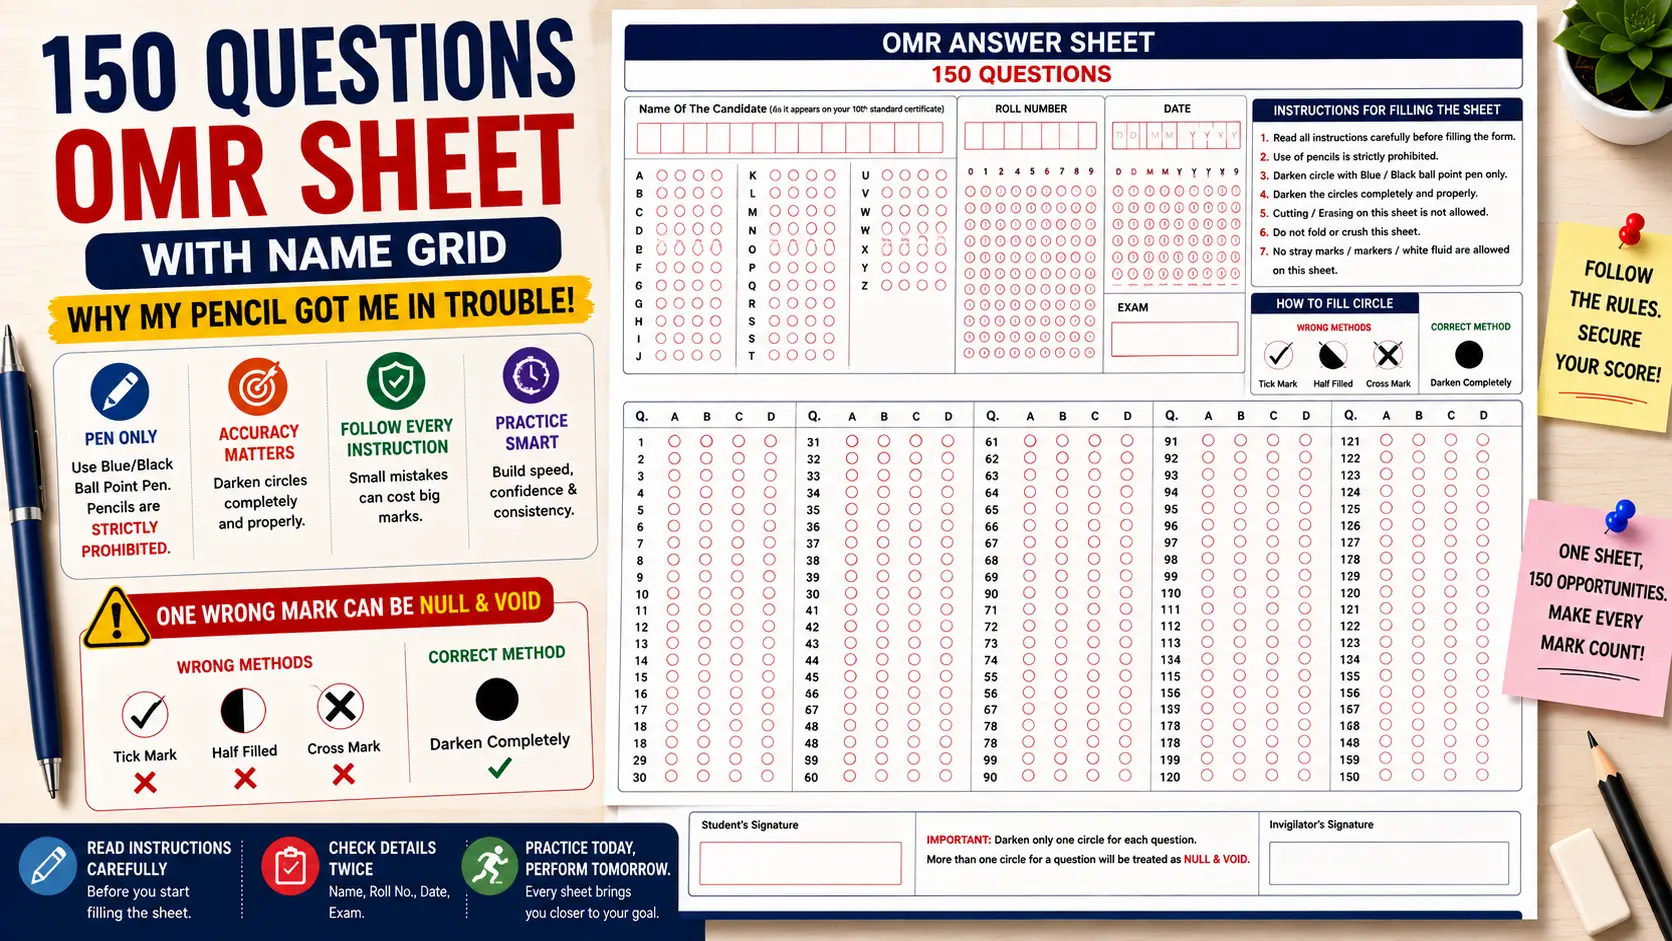
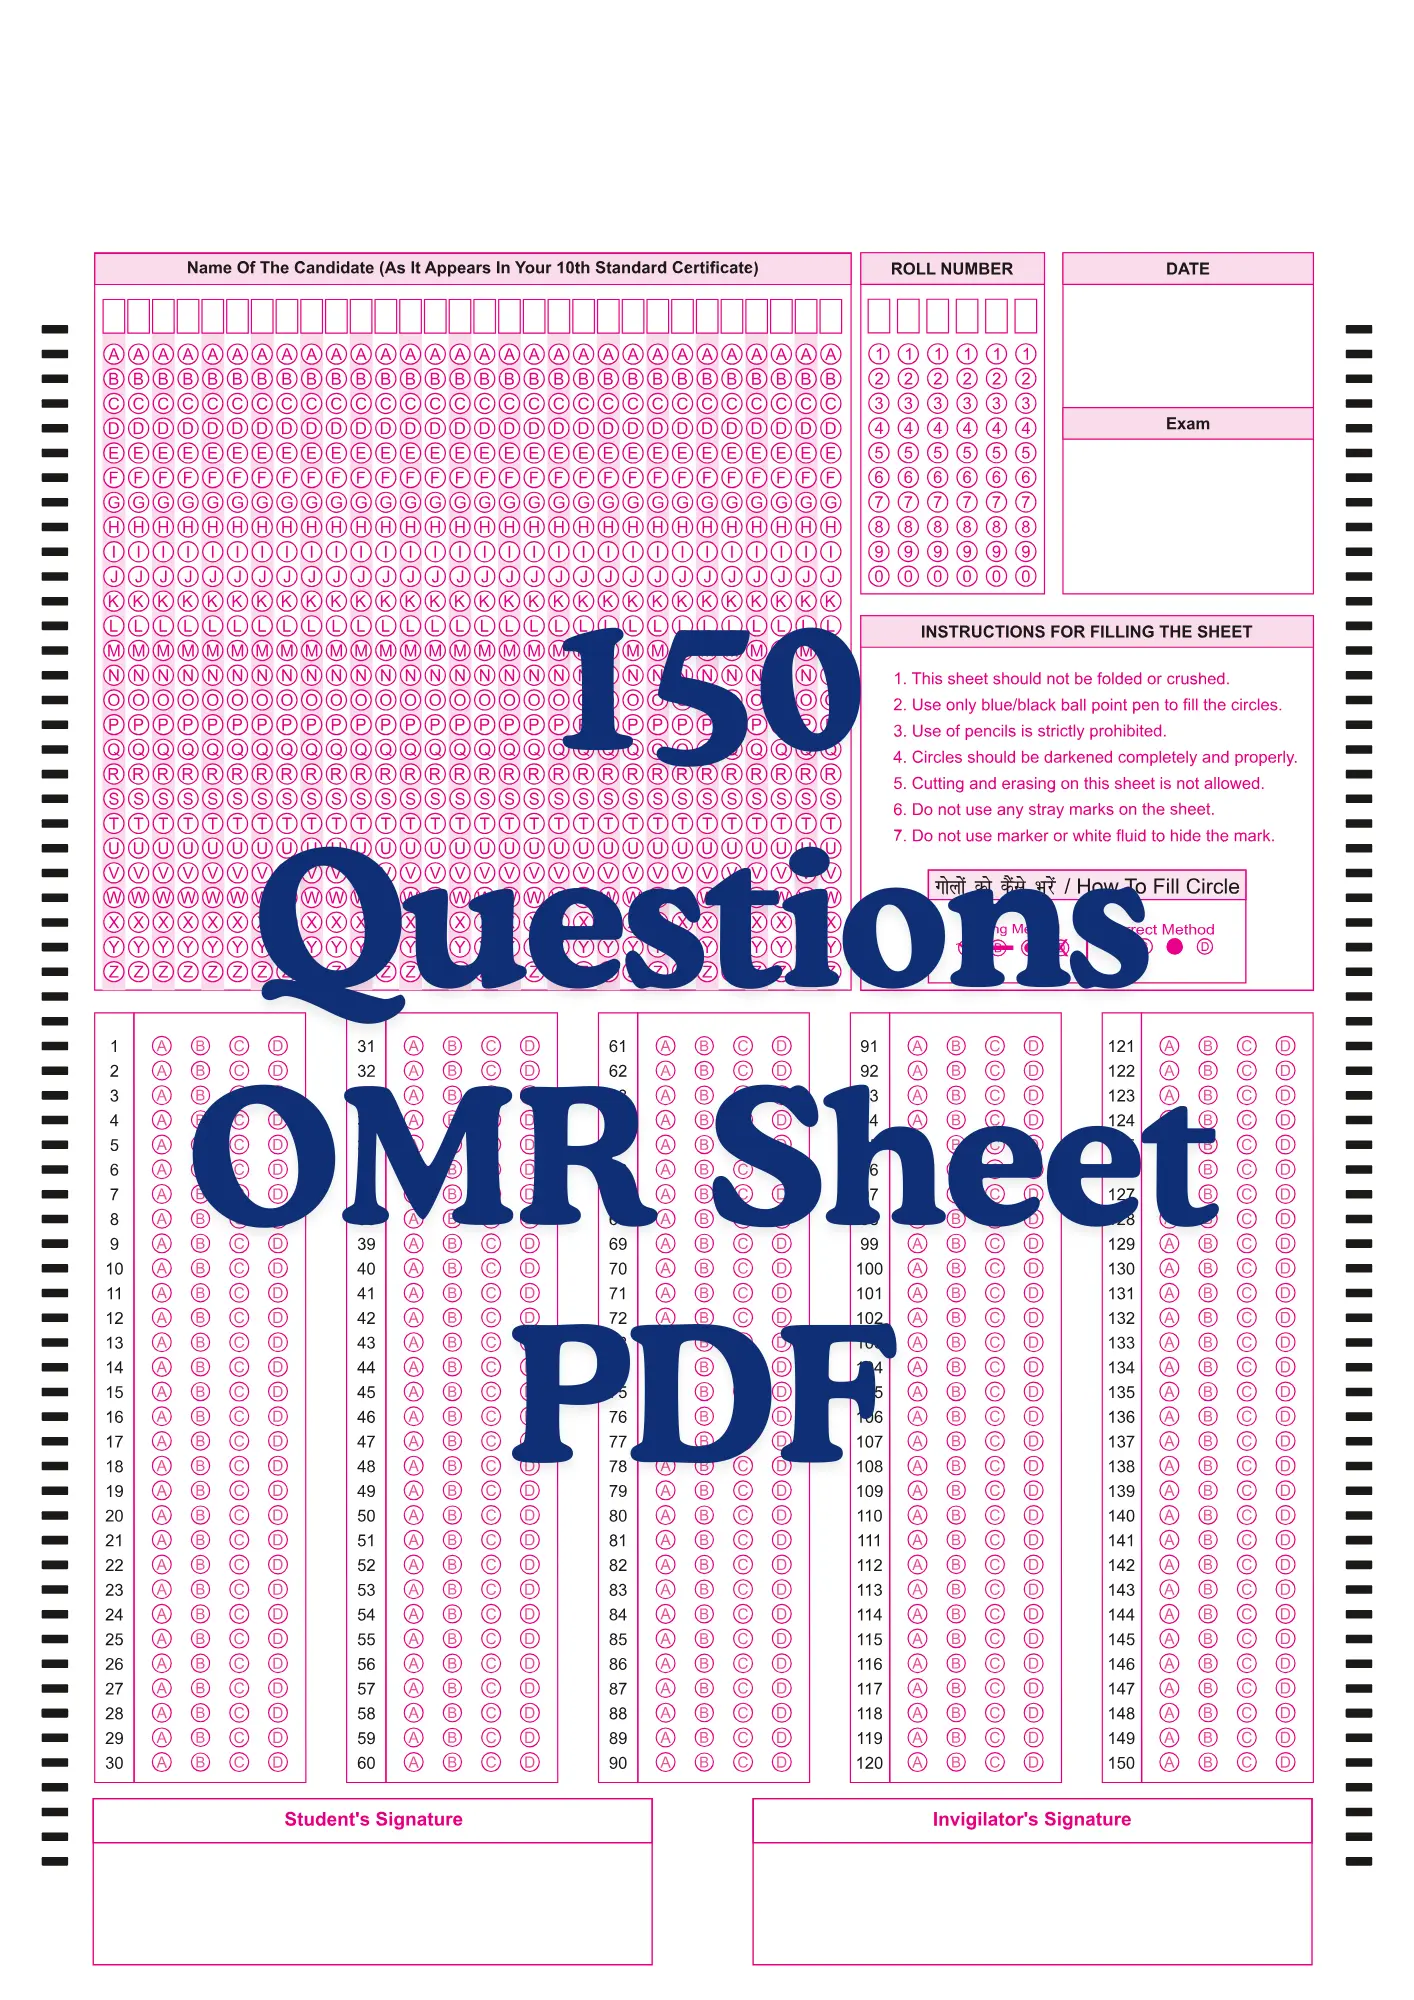
Unlike simpler bubble sheets that just list question numbers and options, this one starts with a large header section split into three clear parts. On the left, there is a full Name Of The Candidate grid, described specifically as it should appear on your 10th standard certificate. Next to it sit separate ROLL NUMBER and DATE boxes, followed by an Exam field where you write out exactly which test or subject you are practicing for.
The Name grid itself is genuinely massive, stretching across the entire width of the page with a complete alphabet, A through Z, stacked as circles under every single letter box. I remember my first attempt at this grid took several minutes alone, since I had to darken one circle for every letter of my full name across multiple boxes. This level of detail tells you immediately that this sheet is built to closely match a real, formal exam format, not just a casual practice tool.
The Instructions Box That I Almost Skipped
To the right of the header, there is a dedicated Instructions For Filling The Sheet box listing seven clear rules. It states that the sheet should not be folded or crushed, that you should use only a blue or black ball point pen, and that use of pencils is strictly prohibited. This is exactly the rule I broke during my first attempt, and reading it properly afterward made me realize how specific and non-negotiable this instruction actually is.
The remaining rules cover equally important details, including that circles should be darkened completely and properly, that cutting or erasing on the sheet is not allowed, and that no stray marks or markers or white fluid should ever be used to hide a mark. Right below these seven rules, the sheet includes a visual How To Fill Circle guide, clearly showing a Wrong Method with a checkmark, a partially filled circle, and a cross mark, next to a Correct Method showing one fully and solidly darkened circle.
Why the Pen-Only Rule Actually Matters Here
I originally assumed pencils were fine everywhere, since most school-level practice sheets I had used before never enforced this rule strictly. But once I understood how this specific sheet’s instructions worked, I realized pencil marks can smudge, fade, or get accidentally erased in ways that a proper blue or black pen mark simply does not. Since the instructions also state that erasing is not allowed at all on this sheet, a mistake made with pen forces you to be far more careful and deliberate with every single answer.
This pen-only approach genuinely changed how I practiced with this sheet after my first mistake. I stopped rushing through answers carelessly, since I knew there was no erasing option to fall back on if I marked the wrong circle by accident. That single behavior shift made my practice sessions feel a lot closer to the pressure of an actual formal exam.
Step-by-Step: How I Fill This Exact 150-Question Sheet Now
After my pencil mishap, I built a strict order for filling this sheet, and I follow the exact same sequence every single practice attempt now.
- I pick up only a blue or black ball point pen before starting, keeping any pencil completely out of my reach.
- I write my Name Of The Candidate exactly as it appears on my 10th standard certificate, then darken every matching letter circle underneath.
- I fill my ROLL NUMBER, DATE, and Exam fields in the top right section, matching them to my actual practice test details.
- I read through the seven printed instructions once more, quickly refreshing my memory on the rules before answering anything.
- I solve each question separately on rough paper first, deciding my final answer before touching the actual OMR sheet.
- I darken one complete circle per question using steady, even pressure, checking the Correct Method example whenever unsure.
- Since the sheet spans 150 questions across five columns of thirty, I check my current column every fifteen questions or so.
- Right before finishing, I sign in the Student’s Signature box at the bottom, treating this as seriously as an actual exam submission.
This exact sequence stopped me from jumping randomly between sections, which is honestly where most of my earlier mistakes were happening in the first place.
A Mistake I Made With the Name Grid
Beyond the pencil mistake, I once left one letter box blank in the middle of my name grid while filling in a hurry, then completely forgot to darken the matching circle underneath it. Since erasing is not allowed on this sheet, I could not simply fix the gap once I noticed it a few rows later. I had to start over on a fresh printed copy, which taught me to slow down specifically during the name-filling stage, even before touching a single answer.
I also once darkened a circle only halfway, similar to the Wrong Method example shown directly on the sheet, simply because I was moving too quickly through a timed practice round. Comparing my own marks against that printed Correct Method guide became a habit I built afterward, checking my work every twenty or thirty questions instead of only at the very end.
Real Example: Five-Column Pacing During Practice
A classmate of mine used this exact sheet’s five-column, thirty-question layout as a built-in pacing checkpoint during her own mock attempts. She would glance at her timer every time she completed a full column, comparing her actual progress against her planned pace for the full 150-question paper. By her fourth or fifth practice round using this method, she had a much clearer sense of exactly where her speed tended to drop during longer papers.
I picked up this exact habit after watching her use it, and it genuinely helped me manage my own pacing better across later practice sessions. Treating each thirty-question column as its own smaller checkpoint made a long, intimidating sheet feel far more manageable overall.
Common Mistakes to Avoid
Based on my own experience with this exact sheet, along with what I have noticed among fellow students practicing with the same format, these mistakes come up repeatedly.
- Using a pencil instead of the specifically required blue or black ball point pen mentioned in the instructions.
- Leaving a letter box blank in the Name grid without darkening its matching circle underneath.
- Darkening circles only partially, similar to the Wrong Method examples printed directly on the sheet.
- Folding or crushing the sheet, which goes directly against the very first listed instruction.
- Losing track of your current column among the five separate thirty-question blocks on the sheet.
Catching even a couple of these mistakes early during your own practice genuinely reduces the risk of having to restart an entire sheet from scratch.
Final Thoughts
This particular 150 questions OMR sheet, with its detailed name grid and strict pen-only instructions, demands a level of care that goes well beyond simpler practice formats. I only understood exactly why these rules mattered after my own pencil mistake forced me to read the instructions properly for the first time. Once you respect every single rule printed on this sheet, from the pen requirement to the no-erasing policy, filling it becomes a genuine confidence-building exercise.
Practice with a proper pen-only 150-question sheet like this one regularly, and treat the name grid and instructions section with the same seriousness as your actual answers. By the time your real exam day arrives, filling this exact sheet correctly will feel completely natural, leaving your full focus on the 150 questions that truly matter.