I once opened my mock question booklet, started solving from question number one, and marked my very first answer in the Paper Second section instead of Paper First. Both sections sit side by side on the same sheet, and in my rush, I genuinely grabbed the wrong half. That single mix-up taught me to slow down and actually read the sheet layout before touching a single bubble.
If you are preparing for a State Level MTS exam and want to understand how the actual OMR answer sheet works, I have practiced with this exact two-paper format multiple times. I want to walk you through every section, based on what actually confused me and what eventually helped.
Why This Sheet Splits Into Two Separate Papers
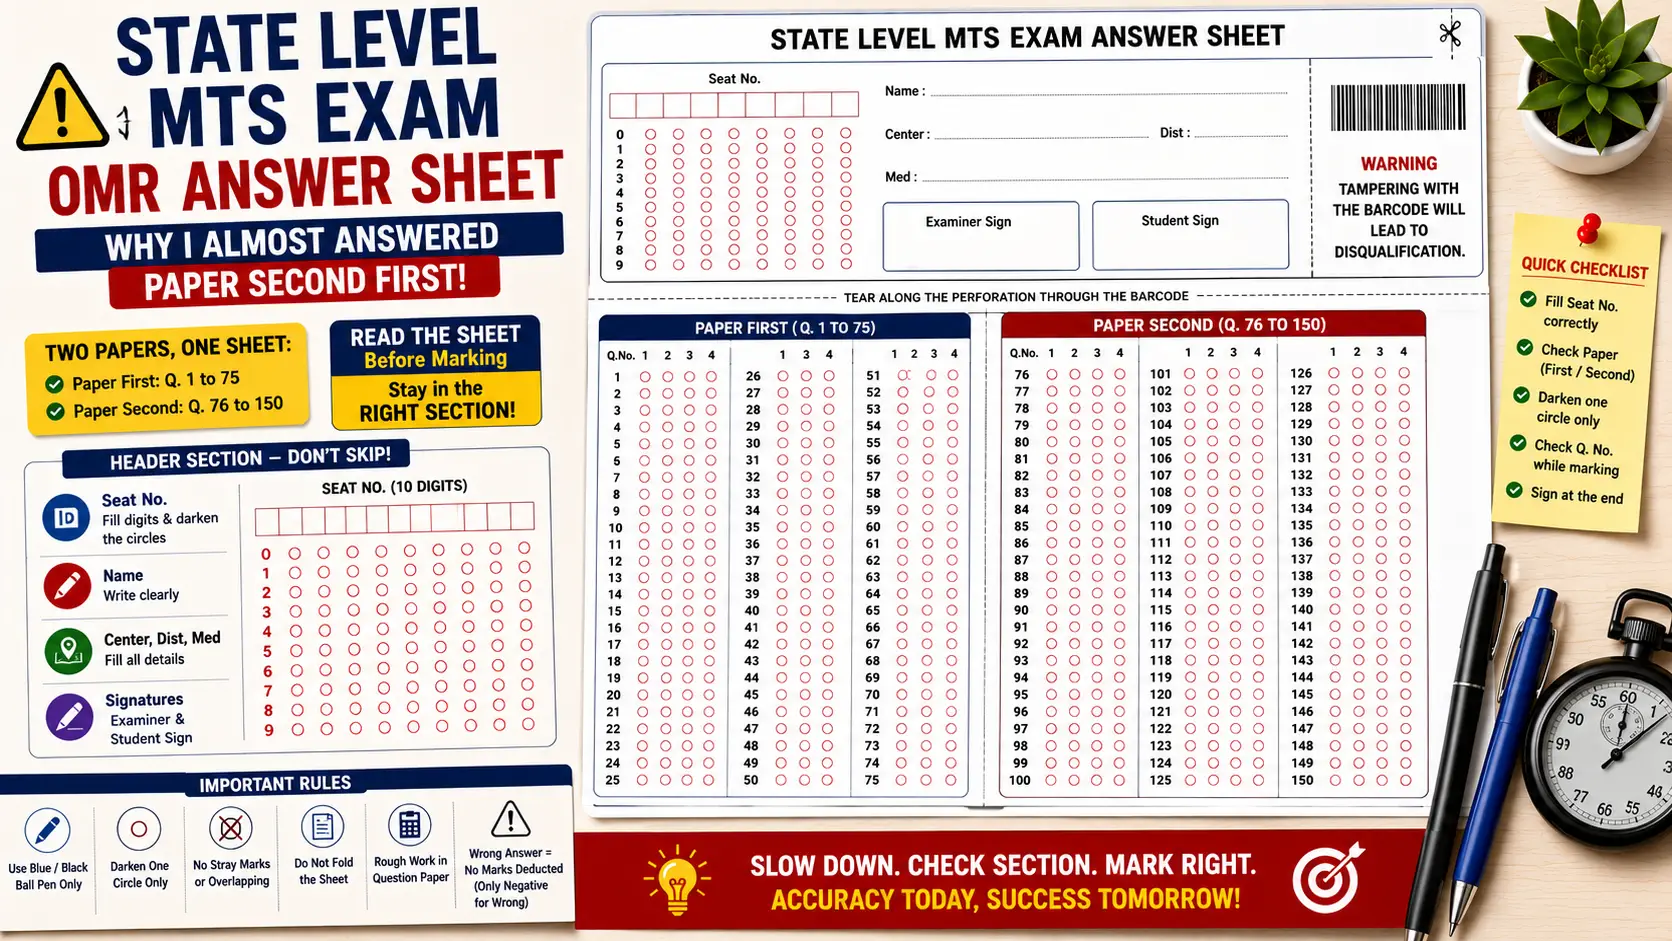
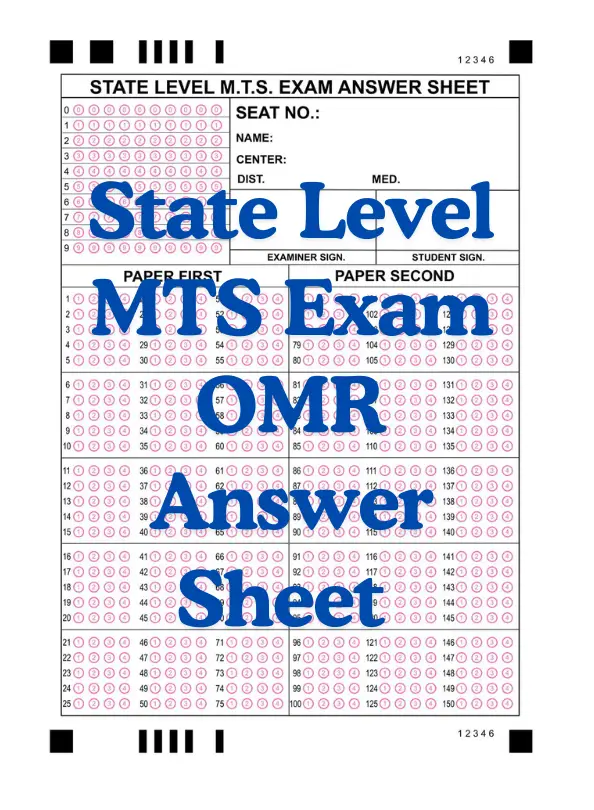
The moment you look at this State Level MTS Exam Answer Sheet, the layout makes it obvious this is not a single-subject test. The bottom half of the sheet is clearly divided into two labeled sections, Paper First on the left and Paper Second on the right, each with its own separate block of question numbers and answer bubbles. Paper First covers questions 1 through 75, while Paper Second covers questions 76 through 150, giving you a full 150-question paper split across two distinct halves.
This structure makes sense once you understand that many State Level MTS exams test two different subject areas or sections within the same overall test. I remember assuming, incorrectly, that the sheet was just one long continuous set of 150 questions arranged in an unusual two-column layout. Reading the printed Paper First and Paper Second labels carefully before starting would have saved me from my early mix-up entirely.
Understanding the Numbered Options on This Sheet
Unlike sheets that use lettered A, B, C, D options, this particular MTS sheet uses numbered options, 1, 2, 3, and 4, for every single question across both papers. I remember pausing during my first attempt, checking my mock question paper twice just to confirm the option numbering actually matched what I saw printed on the sheet. This detail matters a lot, since some coaching materials use lettered options for general practice, which can genuinely throw off your rhythm if the real exam sheet uses numbers instead.
Getting comfortable with numbered options specifically, rather than switching mentally between letters and numbers, made a noticeable difference in my speed during later practice attempts. I now specifically look for practice sheets that match this exact numbered format whenever I am preparing for an MTS-style exam.
The Header Section and What Each Field Actually Means
At the top of the sheet, there is a Seat No. grid using ten separate digit columns, each with a full 0 through 9 set of circles underneath. Right beside it sit simple write-in fields for Name, Center, Dist, and Med, which likely stands for Medium, referring to the language you are answering the exam in. Below these fields, there are two separate boxes for Examiner Sign and Student Sign, placed side by side near the bottom of the header section.
I made the mistake early on of filling my Seat Number digits clearly in the boxes but forgetting to darken the matching circles underneath each one. Since the Seat Number grid on this sheet spans a full ten digit columns, missing even one circle can genuinely throw off how the entire coded number gets read. I now always double check that every written digit has its matching circle properly darkened before moving on to the actual answer sections.
Step-by-Step: How I Practice With This Exact Sheet Now
After my Paper First and Paper Second mix-up, along with my Seat Number mistake, I built a fixed order for filling this sheet, and I follow the exact same sequence every single practice attempt now.
- I fill my Seat No. in the digit boxes first, then carefully darken the matching circle below each individual number.
- I write my Name, Center, Dist, and Med clearly in their designated fields, treating these details as seriously as the actual answers.
- I confirm which section, Paper First or Paper Second, my current question paper actually corresponds to before marking anything.
- I solve each question on a separate rough sheet first, deciding my final numbered answer before touching the actual OMR sheet.
- I mark exactly one complete circle per question, using the numbered 1, 2, 3, 4 options consistently across both papers.
- Every twenty-five questions, I check my current question number against the printed row to avoid drifting into the wrong section.
- Once I finish Paper First, I move on to Paper Second only after confirming my question paper has actually shifted to that section as well.
- Right before finishing, I check that both the Examiner Sign and Student Sign areas are handled appropriately, based on whether it is a real exam or a mock attempt.
This exact order stopped me from jumping straight into answering questions without first confirming which paper section I was actually supposed to be working through.
A Mistake That Taught Me to Read the Layout First
Beyond my initial Paper First and Paper Second mix-up, I once continued marking answers into the wrong column entirely while moving from question 75 into question 76. Since Paper First ends exactly at question 75 and Paper Second begins at 76 right beside it on the same row, it is genuinely easy to accidentally slide into the neighboring section without noticing. I only caught this because I had built the habit of checking my current question number against the printed label every twenty-five questions.
This specific boundary between question 75 and 76 became something I now pay extra attention to during every single practice attempt. It is the exact spot where the sheet transitions from one paper to another, and it is also exactly where careless drift is most likely to happen.
Real Example: Why Section Awareness Actually Matters
A fellow MTS aspirant I practiced alongside mentioned that she treats Paper First and Paper Second as two completely separate mini-exams within the same sheet, rather than one continuous 150-question block. She pauses briefly after finishing question 75, confirms she has moved on to the correct new section in her question booklet, and only then continues marking answers into Paper Second. This small mental checkpoint, built directly around the sheet’s own two-paper structure, genuinely helped her avoid the exact mix-up I made during my own early practice.
I adopted this same checkpoint habit after hearing about her approach, and it made a real difference in how confidently I moved between the two sections during timed mock attempts.
Common Mistakes to Avoid
Based on my own experience with this exact sheet, along with what I have noticed among fellow MTS aspirants, these mistakes come up most often.
- Marking answers in Paper Second while your question paper is still on Paper First, especially near the question 75 to 76 boundary.
- Writing Seat Number digits clearly but forgetting to darken the matching circles underneath each one.
- Confusing the numbered 1, 2, 3, 4 option format with a lettered A, B, C, D system used in other practice materials.
- Skipping the Center, Dist, or Med fields, treating them as less important than the actual answer bubbles.
- Losing track of your question number while transitioning between the two separate paper sections on the same sheet.
Catching even a couple of these mistakes early during your own mock practice genuinely reduces the risk of an avoidable, section-related error.
Final Thoughts
The State Level MTS Exam OMR Answer Sheet’s two-paper structure genuinely demands more attention than a simple single-section sheet, especially around the exact boundary between Paper First and Paper Second. I only understood how easily this section mix-up could happen after making the exact mistake myself during early practice. Once you build the habit of confirming your current section before marking anything, this sheet becomes far easier to manage confidently.
Practice with a proper State Level MTS-style OMR sheet regularly, paying close attention to the Seat Number grid and the transition point between the two paper sections. By the time your actual MTS exam day arrives, filling this sheet correctly across both papers will feel completely automatic, leaving your full focus on the questions that truly decide your result.