I still remember staring at the “Marks Obtained” box after my first full UPSC prelims mock test, genuinely confused about why my score looked so much lower than the number of questions I got right. That is when a senior explained negative marking to me properly, right there on my own OMR sheet, using the same boxes I had ignored while filling it in a rush. That one conversation changed how seriously I took every single mock test after that.
If you are searching for a UPSC Prelims mock test OMR answer sheet, you are probably deep into your civil services preparation right now. I have filled out this exact sheet more times than I can count during my own prelims practice, and I want to walk you through the parts that genuinely matter, based on what actually helped me.
Why This Sheet Looks More Detailed Than a Regular Mock Sheet
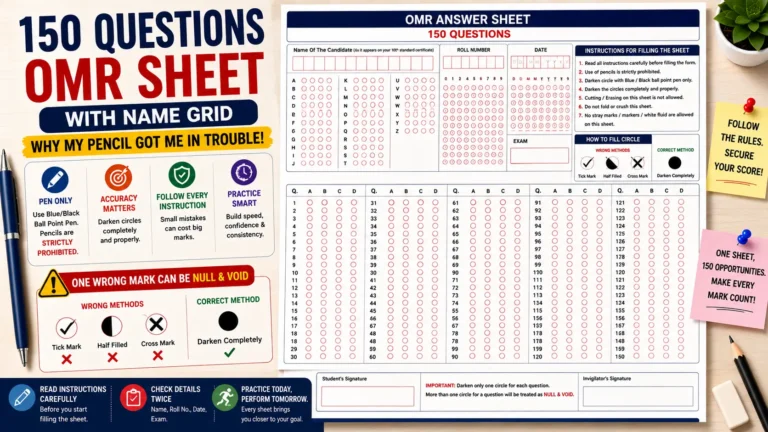
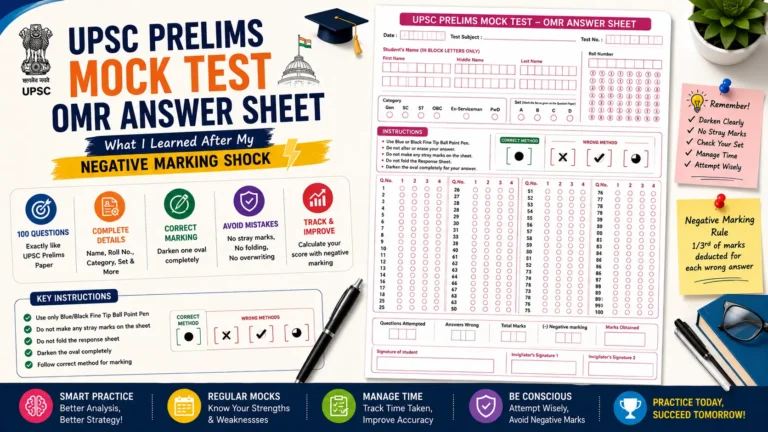
The moment you look at a proper UPSC Prelims Mock OMR Answer Sheet, you notice it carries a lot more than just question numbers and bubbles. Right at the top, there is a Date field, a Test Subject line, and a Test Number field, all meant to be filled before you even start attempting questions. This matters more than it seems, since keeping a record of which subject and test number you practiced helps you track your progress across weeks of preparation.
Below that sits the Student’s Name section, written in block letters only, followed immediately by a massive scannable name grid underneath it.
This name grid is not just for show, it mirrors the exact letter-by-letter darkening system used in real UPSC OMR sheets, where each letter of your name gets marked using its corresponding circle. I remember my first attempt at this grid took nearly five minutes alone, simply because I was not used to darkening an entire row of circles just to represent my own name.
The Category, Set, and Roll Number Sections
Right beside the instructions box, there is a Category section listing Gen, SC, ST, OBC, Ex-Serviceman, and PwD, each with its own circle to mark.
This detail genuinely surprised me the first time, since most coaching mock sheets I had used before never included a category selection at all. Selecting the correct category during practice builds the exact habit you need for the real UPSC prelims exam day.
Next to the Category box sits a smaller Set section, letting you mark your specific question paper set for that test. Right beside it, a proper Roll Number grid asks you to fill your digits into individual boxes and then darken the matching circle below each one.
I made the mistake early on of writing my roll number clearly but skipping the circles underneath, thinking the written digits were enough on their own.
Reading the Instructions Box Properly
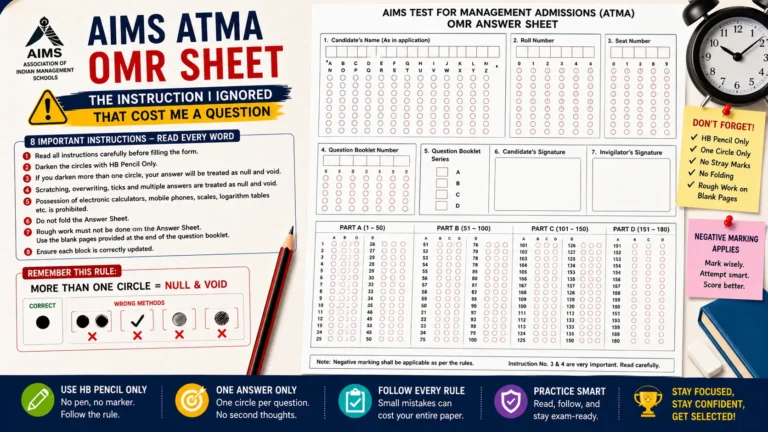
The instructions printed directly on the sheet are short, but each line actually matters a lot more than it looks at first glance.
It clearly states you should use only a Blue or Black Fine Tip Ball Point Pen, and I specifically remember reaching for a regular pen from my desk drawer during my first attempt without checking the tip type at all. A fine tip pen genuinely makes a difference here, since the bubbles on this sheet are packed fairly close together.
The instructions also state clearly that you should not make any stray marks on the sheet and that you should never fold the response sheet at all. I learned this lesson after folding a completed mock sheet in half to fit it into my study folder, only to realize later that the crease ran straight through several answer rows.
A visual guide right below these instructions shows a Correct Method next to three separate Wrong Method examples, showing exactly how a properly darkened oval should look compared to a half-filled, cross-marked, or lightly scribbled one.
Step-by-Step: How I Fill My UPSC Prelims Mock Test OMR Now
After my early mistakes, I built a fixed routine for every single mock test, and this same order has stayed consistent through months of practice.
- I fill the Date, Test Subject, and Test Number fields first, treating this as part of my own progress record, not just formality.
- I write my Student’s Name in block letters, then carefully darken the entire scannable name grid underneath, letter by letter.
- I mark my Category circle correctly, along with my Set letter, matching it exactly to what is printed on my question booklet.
- I fill my Roll Number in the digit boxes, then darken the matching circle below each individual digit without skipping this step.
- I solve each question on a separate rough sheet first, deciding my final answer before touching the actual OMR sheet.
- I darken one complete oval per question using a fine tip blue or black pen, checking the Correct Method example if I ever feel unsure.
- Every twenty-five questions, I pause and check my current column, since the sheet splits 100 questions across four separate columns.
- Once finished, I fill in the Questions Attempted, Answers Wrong, and Time Taken boxes at the bottom, calculating my Marks Obtained using the listed negative marking rule.
This final step, filling in my own scoring details, genuinely changed how I approached practice. It forced me to actually calculate my negative marking impact instead of just checking which answers were right or wrong.
The Scoring Section That Taught Me a Real Lesson
At the very bottom of the sheet, there is a scoring block asking for Questions Attempted, Answers Wrong, Total Marks, and specifically a line for (-)Negative marking, followed by Marks Obtained. This is exactly the section that confused me during my very first mock test, since I had never manually calculated negative marking before.
I remember getting several questions right, but attempting a few risky guesses that ended up dragging my final Marks Obtained down significantly once the negative marking was subtracted.
That single mock test taught me more about UPSC’s actual scoring pattern than any online article had managed to explain. Filling in this section honestly, every single time, forced me to reflect on which of my wrong answers came from genuine confusion versus careless guessing.
Over several weeks, my Answers Wrong count dropped noticeably, simply because I started attempting only the questions I was reasonably confident about.
A Mistake That Cost Me Real Time
During one timed mock attempt, I lost track of my column while moving from question 25 into question 26, since the sheet splits its 100 questions into four columns of twenty-five each.
I ended up marking three answers in the wrong column before catching the mismatch nearly ten questions later. Fixing this mid-test, without folding or damaging the sheet, meant carefully rechecking every single answer in that stretch, which cost me almost eight minutes I genuinely could not spare.
That mistake taught me to always glance at the printed question number beside every row before darkening any oval, no matter how confident I felt about my pace. On a sheet with four separate columns, losing your place even once can quietly damage your entire practice score without you even directly making a content mistake.
Real Example: Why Tracking Test Number Actually Helps
A study partner of mine started numbering her mock tests using the Test Number field exactly as the sheet intended, rather than just tossing completed sheets into a random pile.
Over three months, she built a proper filing system, using her Test Subject and Test Number entries to track exactly which subjects needed more practice. This small habit, built directly around filling the sheet properly from the start, genuinely helped her identify weak areas faster than just relying on memory.
Common Mistakes to Avoid
Based on my own mock attempts and details taken directly from the actual sheet’s instructions, these mistakes come up most often.
- Using a regular pen instead of the specific Blue or Black Fine Tip Ball Point Pen mentioned in the instructions.
- Writing your Roll Number digits clearly but forgetting to darken the matching circles underneath each one.
- Folding the response sheet to fit it into a folder or bag, damaging answer rows in the process.
- Skipping the Category or Set selection, treating them as optional when they genuinely are not.
- Losing track of your column among the four separate 25-question blocks on the sheet.
- Ignoring the scoring section at the bottom, missing out on a real chance to understand your own negative marking pattern.
Fixing even a few of these habits early through consistent, honest mock practice genuinely builds the discipline UPSC prelims demands.
Final Thoughts
A UPSC Prelims Mock Test OMR Answer Sheet is built with far more structure than a simple bubble sheet, and understanding every section properly makes a real difference to your preparation. I only understood the true value of the Category, Set, and scoring sections after making several mistakes myself across multiple mock attempts. Once you treat every section seriously, from the name grid to the final Marks Obtained box, this sheet becomes a genuine preparation tool, not just a formality.
Practice with a proper UPSC-style mock OMR sheet regularly, fill in every section honestly including your scoring details, and pay close attention to your column tracking on longer papers. By the time your actual UPSC prelims exam day arrives, filling this sheet correctly will feel completely automatic, leaving your full focus on the questions that truly decide your result.